

A properly adjusted headset lets the handlebar turn smoothly while keeping the front end steady. If it feels loose, stiff or notchy, the bike may respond less predictably. For an Aventon Soltera headset adjustment in Fort Saskatchewan, start by identifying whether the steering feels loose, binds or turns roughly.
When a ride feels uncomfortable, it’s easy to focus on saddle height or handlebar position. Those affect fit, but headset condition matters too: the headset connects steering movement to the front wheel, so excess play or binding can affect handling. Adjustment does not change the frame geometry or create a new riding position.
This guide explains how headset adjustment relates to handlebar fit, riding position, ride quality and steering response. Learn which signs to look for, how an adjustment that is too loose or too tight can cause problems, and when hands-on maintenance makes sense. The goal is a smooth, steady front end that feels natural under your hands.
Key Takeaways
- Learn how headset preload affects smooth steering and front-end stability without changing your bike’s frame geometry.
- Recognize the difference between steering play and resistance so you can spot a headset that may be too loose or too tight.
- Understand which tools are used for an adjustment and why the correct torque depends on the bike’s specific components.
- Follow a safe inspection sequence before deciding whether the headset needs adjustment or further maintenance.
- See when E-Bike Maintenance can help address persistent steering play, binding or uncertainty during an adjustment.
How do you adjust a bicycle headset?
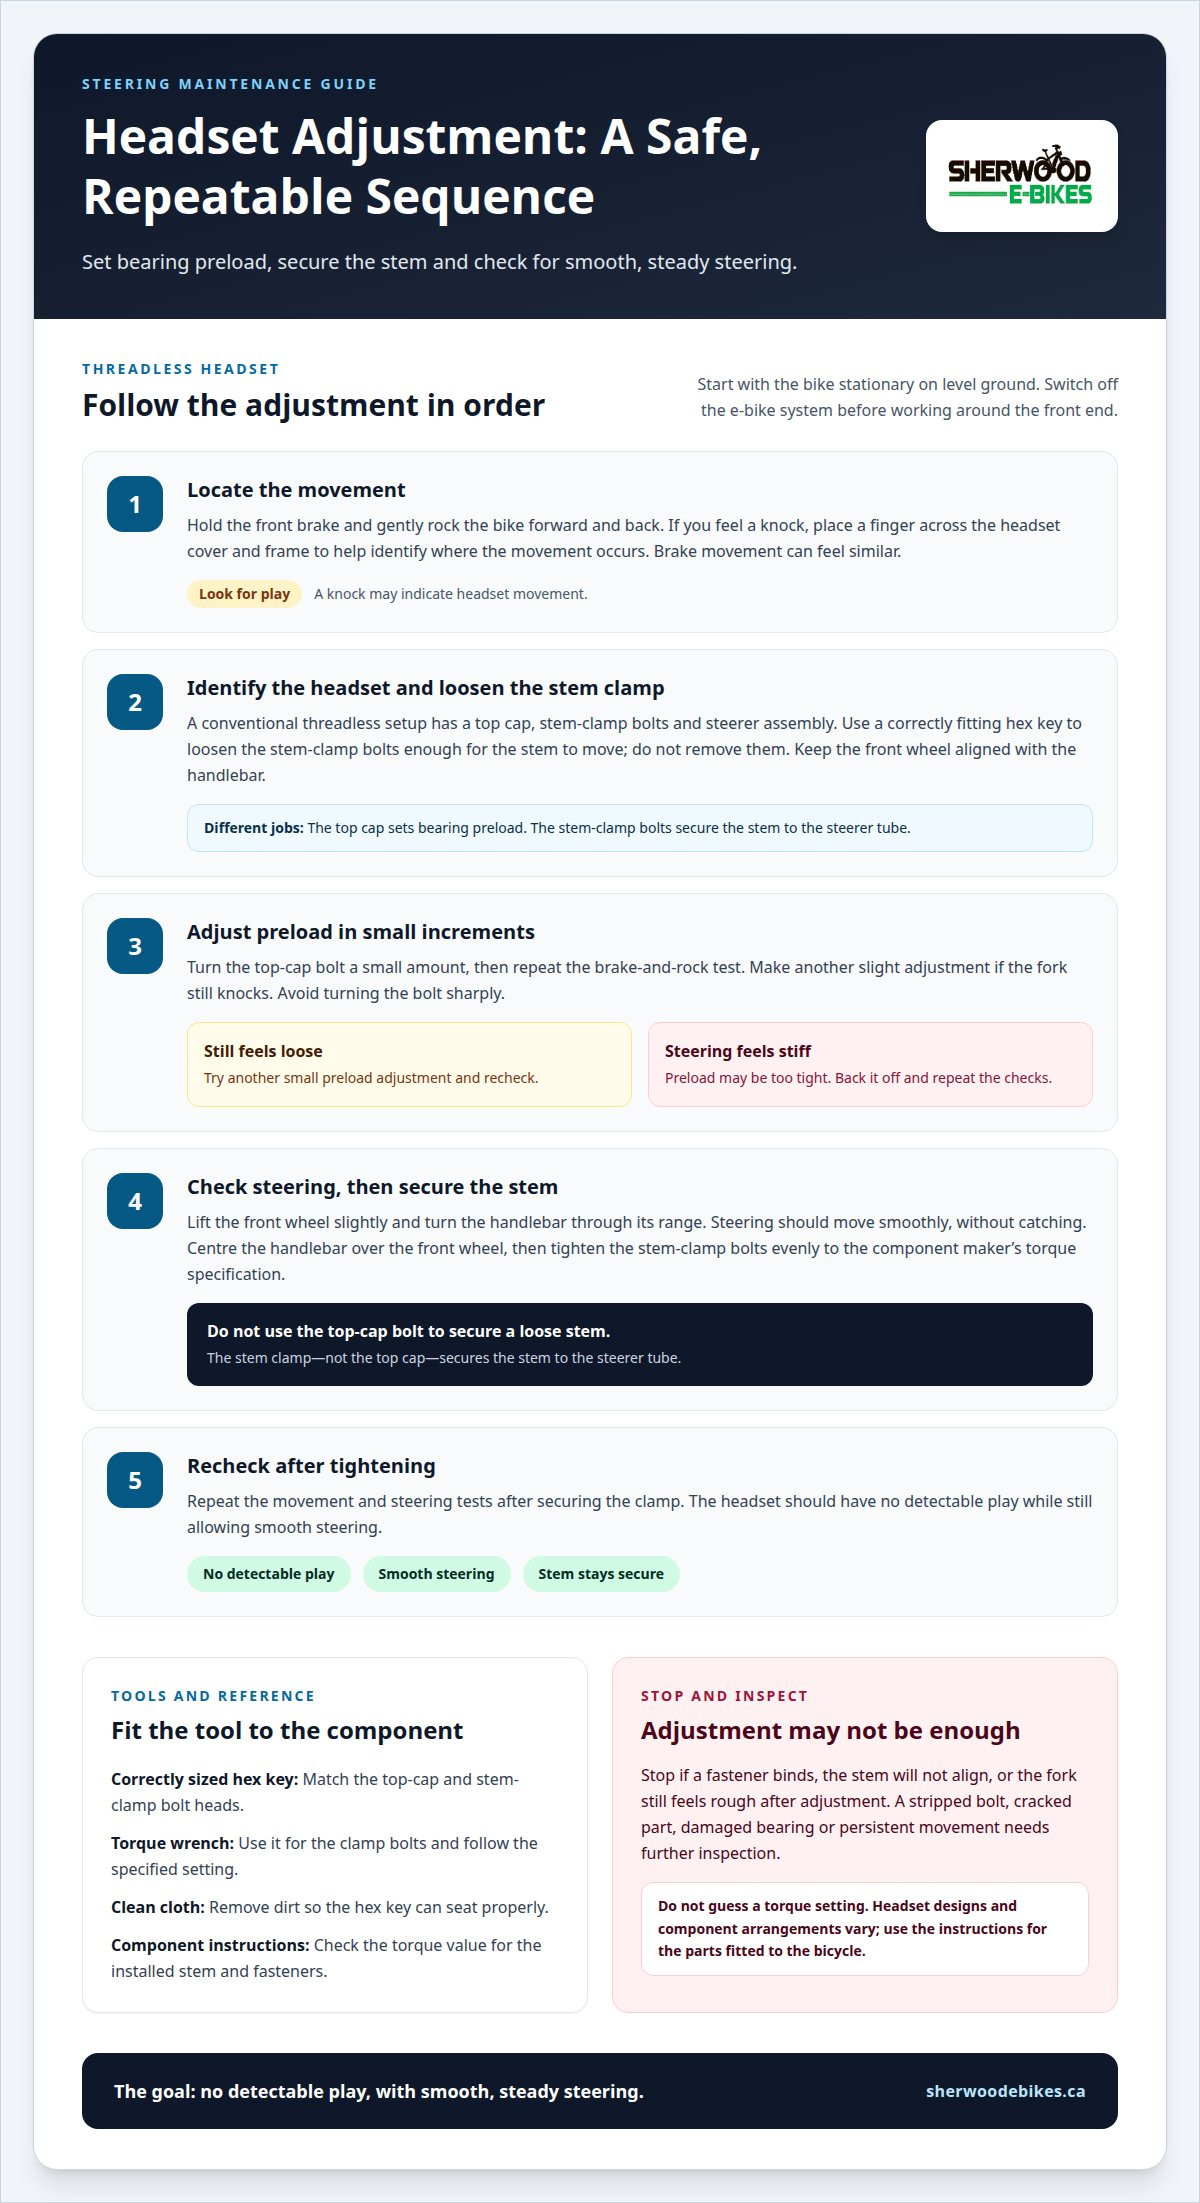
For an Aventon Soltera headset adjustment in Fort Saskatchewan, first identify the headset arrangement. A conventional threadless headset has a top cap, stem-clamp bolts and steerer assembly. The top cap sets bearing preload; the stem bolts secure the stem. Tightening the top cap alone cannot secure a loose stem. Other headset designs may need a different procedure.
Start with the bike stationary on level ground. Switch off the e-bike system before working around the handlebar and front end. Hold the front brake and gently rock the bike forward and back. A knock near the headset can indicate play, though brake movement can feel similar. Place a finger across the headset cover and frame to feel where the movement occurs.
For a threadless system, use a correctly fitting hex key on the stem’s steerer-clamp bolts. Loosen them enough for the stem to move, but do not remove them. Keep the front wheel aligned with the handlebar. Turn the top-cap bolt in small increments, then check whether the play has decreased. The fork should still turn freely. The top cap preloads the bearings; it does not secure the stem by itself.
- Check alignment: Centre the handlebar over the front wheel before tightening the stem clamp.
- Set preload: Make a small top-cap adjustment, then repeat the brake-and-rock test.
- Test steering: Lift the front wheel slightly and turn the handlebar through its range. It should move smoothly, without catching.
- Secure the stem: Tighten the stem-clamp bolts evenly, following the component maker’s torque specification.
- Recheck: Repeat the movement and steering tests after securing the clamp.
Small changes matter. If the fork still knocks, make another slight preload adjustment rather than turning the bolt sharply. If steering becomes stiff or no longer moves smoothly, the adjustment is too tight. Back off the preload, realign the stem and repeat the checks. The headset should have no detectable play while allowing smooth steering.
Do not use the top-cap bolt to correct a stem that remains loose after its clamp bolts are secured. The stem clamp, steerer tube and headset bearings do different jobs. A stripped bolt, cracked part, damaged bearing or persistent movement needs further inspection. Riding with an unsecured stem can affect control.
Headset designs and component arrangements vary, so follow the instructions and torque values for the parts installed on your bicycle. Do not guess a torque setting or substitute a general value. A torque wrench helps apply the specified force, while a correctly sized hex key helps prevent damage to bolt heads. Stop if a fastener binds, the stem will not align, or the fork still feels rough after adjustment.
For an Aventon Soltera headset adjustment in Fort Saskatchewan, follow a clear sequence: locate the play, identify the headset type, adjust preload in small increments, secure the stem and retest. This addresses steering without treating handlebar height or reach as headset settings. If steering remains stiff, notchy or loose, the underlying issue may need more than an adjustment.
What tools and torque settings are needed for a headset adjustment?
A headset adjustment requires tools that fit the installed stem and fasteners. Start with a correctly sized hex key and a torque wrench. The hex key engages the top-cap and stem-clamp bolts; the torque wrench controls final tightening of the clamp. Sizes vary by component, so inspect each bolt head before choosing a tool.
Seat the hex key fully in the bolt. A poor fit can damage the bolt head and make later service difficult. Check the top-cap and stem-clamp bolts separately, as they may use different key sizes. A folding hex set can work for basic access, while a longer tool may reach a recessed fastener more easily. Do not force a key that rocks inside the bolt.
Keep the tools clean and in good condition. Dirt inside a bolt head can prevent the hex key from seating properly. Wipe the area before inserting the tool, then check for rounded edges, corrosion or a damaged fastener. If a bolt head is compromised, stop rather than applying more force with a tool that could slip.
- Hex keys: Use the exact sizes that fit the top-cap and stem-clamp bolts.
- Torque wrench: Choose a wrench that covers the component’s specified setting and accepts the required bit.
- Clean cloth: Remove dirt from the bolt heads and stem area before tool engagement.
- Component instructions: Find the torque value for the installed stem and fasteners.
Torque settings depend on the specific stem and fasteners fitted to the bicycle. Use the value marked on the stem or given in its component instructions. Do not assume similar-looking stems share the same setting. A value intended for another component can leave the clamp insufficiently secured or put excess force on the parts.
The top-cap bolt and stem-clamp bolts serve different functions. The top cap applies bearing preload; the clamp bolts secure the stem to the steerer tube. Use a torque wrench on the clamp bolts, not to add force to the top cap. Excess preload can make steering resist turning. Follow the instructions for the headset design rather than treating every bolt alike.
Tighten clamp bolts gradually and evenly. If the stem has multiple clamp bolts, alternate between them instead of fully tightening one first. Set the torque wrench according to its instructions, keep the bit straight and stop at the specified setting. Do not add force after the wrench signals the target. Extensions can affect leverage, so follow the wrench maker’s directions before using one.
After tightening, confirm that the stem stays secure and the handlebar remains aligned with the front wheel. A torque reading alone does not confirm that the headset is correctly adjusted. If steering binds or movement remains, stop and inspect the assembly. Correct tool fit and the component-specific torque value matter more than guessing a familiar setting.
How can you tell if a bicycle headset is loose or too tight?
A loose headset often allows movement between the fork and frame when you rock the bike. A tight headset feels resistant as the handlebar turns. Test for both while the bicycle is stationary. These signs point to different problems, so note whether you feel a knock, roughness or drag before making adjustments.
To check for play, stand beside the front wheel and hold the front brake. Gently rock the bicycle forward and back while placing a finger across the headset cover and frame. A tap or shifting sensation at that joint suggests movement. If the sensation seems to come from the brake, repeat the test while watching the brake components.
Next, lift the front wheel slightly and turn the handlebar slowly from side to side. Movement should feel smooth and even throughout the steering range. A tight headset may feel heavy, sticky or reluctant to turn. A rough, notchy sensation can indicate bearing wear or damage, not just excess preload. Do not try to hide roughness by loosening the adjustment.
- Possible looseness: A knock at the headset while the front brake is held and the bicycle rocks.
- Possible excess tightness: The handlebar resists turning or feels unusually heavy with the front wheel lifted.
- Possible bearing trouble: Steering catches at a particular point or feels rough across its movement.
- Possible separate issue: The movement appears at the brake or another front-end part, rather than the headset.
A single test can mislead. For example, a brake that shifts slightly may click during the rocking check. Keep your fingers at the headset joint as you rock the bicycle, then compare the sensation with the brake. If the sound continues but you cannot feel movement at the headset, inspect the source before changing preload.
Handlebar behaviour can also help distinguish an adjustment issue from a fit concern. If the steering turns freely but your wrists feel strained, headset preload is unlikely to correct handlebar reach or height. Those are separate fit factors. If the handlebar feels stiff even with the front wheel raised, focus on steering resistance rather than changing your riding position.
After any adjustment, repeat the same checks. Hold the front brake and rock the bicycle, then lift the wheel and turn the handlebar. A change from a distinct knock to smooth, free steering suggests the adjustment affected the headset. If the knock remains or steering becomes tight, stop adjusting and look for another cause.
Also watch for the stem shifting against the front wheel when you turn the handlebar. That differs from bearing play and may mean the stem is not secure. Do not ride with a moving stem. Confirm the component fasteners are secure at their specified settings, then check alignment and steering again.
For riders in Fort Saskatchewan, a reliable diagnosis comes from comparing these signs rather than tightening by feel alone. Play, binding, notchy movement and a shifting stem each call for a different check. If the headset still feels abnormal after inspection, further assessment can determine whether it needs adjustment, bearing service or another repair.
How do you check and tighten a bicycle headset safely?
Start with the bicycle switched off and parked on a stable, level surface. Keep the front wheel straight and remove any load from the handlebar. Check the headset cover, stem and steerer area for visible cracks, loose parts or damage. If a component is cracked or a fastener is damaged, stop before attempting an adjustment.
Hold the front brake and gently rock the bicycle forward and back. Place a finger across the headset and frame to feel for movement at the joint. A knock or shifting sensation there can indicate headset play. Check the brake separately, since movement in its parts can also create a click during this test.
Next, raise the front wheel enough to turn the handlebar freely. Sweep it slowly from side to side. The fork should move smoothly, without catching, roughness or unusual resistance. A notch or grinding sensation can indicate a bearing problem rather than a simple adjustment. Do not tighten the headset to mask rough steering.
- Identify the headset type: Look at the stem, top cap and steerer arrangement. A threadless setup uses a top cap and stem-clamp bolts, but other designs need different procedures.
- Choose the correct tools: Fit the right hex key fully into each bolt. Use the component’s instructions for the specified torque setting.
- Release the stem clamp: For a threadless setup, loosen the stem-clamp bolts enough for adjustment. Don’t remove them or allow the handlebar to twist unexpectedly.
- Adjust preload carefully: Turn the top-cap bolt in small increments. Recheck for play and smooth steering after each adjustment.
- Align and secure: Centre the handlebar with the front wheel. Tighten the stem-clamp bolts evenly to the component’s stated setting.
- Repeat the tests: Check for headset movement with the brake held. Then lift the front wheel and turn the handlebar again.
The top cap sets bearing preload; it does not secure the stem. The stem-clamp bolts hold the stem on the steerer. Do not use extra top-cap force to stop a loose stem from moving. If the handlebar shifts against the front wheel, correct the clamp issue before riding.
Stop if a bolt binds, its head begins to round, or the stem will not stay aligned. Also stop if steering becomes stiff or headset movement remains after careful adjustment. A persistent knock may come from another front-end part, while rough rotation can indicate worn or damaged bearings. Further tightening may make either problem worse.
Finish by confirming that the stem stays aligned and the handlebar turns freely. Repeat the brake-and-rock test, then check that no play returns. Don’t ride if the stem moves, steering binds or the source of a knock remains unclear. For a hands-on assessment, book an e-bike service appointment.
Sherwood E-Bikes
Sherwood E-Bikes Ltd. can help if headset play, stiff steering or a persistent front-end knock remains after adjustment. E-Bike Maintenance is a practical next step when symptoms point beyond a simple preload change. An assessment can help identify whether the issue involves headset adjustment, worn parts or another steering component.
If a part needs replacement, E-Bike Parts and Cycling Accessories can support the repair. Describe when the movement or resistance occurs, such as while turning the handlebar or rocking the bike with the front brake held. That detail helps focus the maintenance discussion on the symptom.
Contact Sherwood E-Bikes Ltd. to discuss your bicycle’s steering concern and maintenance needs.
Set up your next ride with confidence
A well-maintained bike supports a more settled start to each commute and helps you focus on the route ahead. If steering concerns continue, or you would prefer a professional assessment, choose a next step that fits your riding needs.
Sherwood E-Bikes Ltd. offers E-Bike Maintenance, E-Bike Parts and Commuter E-Bikes. Whether you need help with ongoing upkeep, a replacement component or a different ride for daily travel, the right support can help you move forward with confidence.
Contact Sherwood E-Bikes Ltd. for help with your bike and plan your next ride with confidence.


