

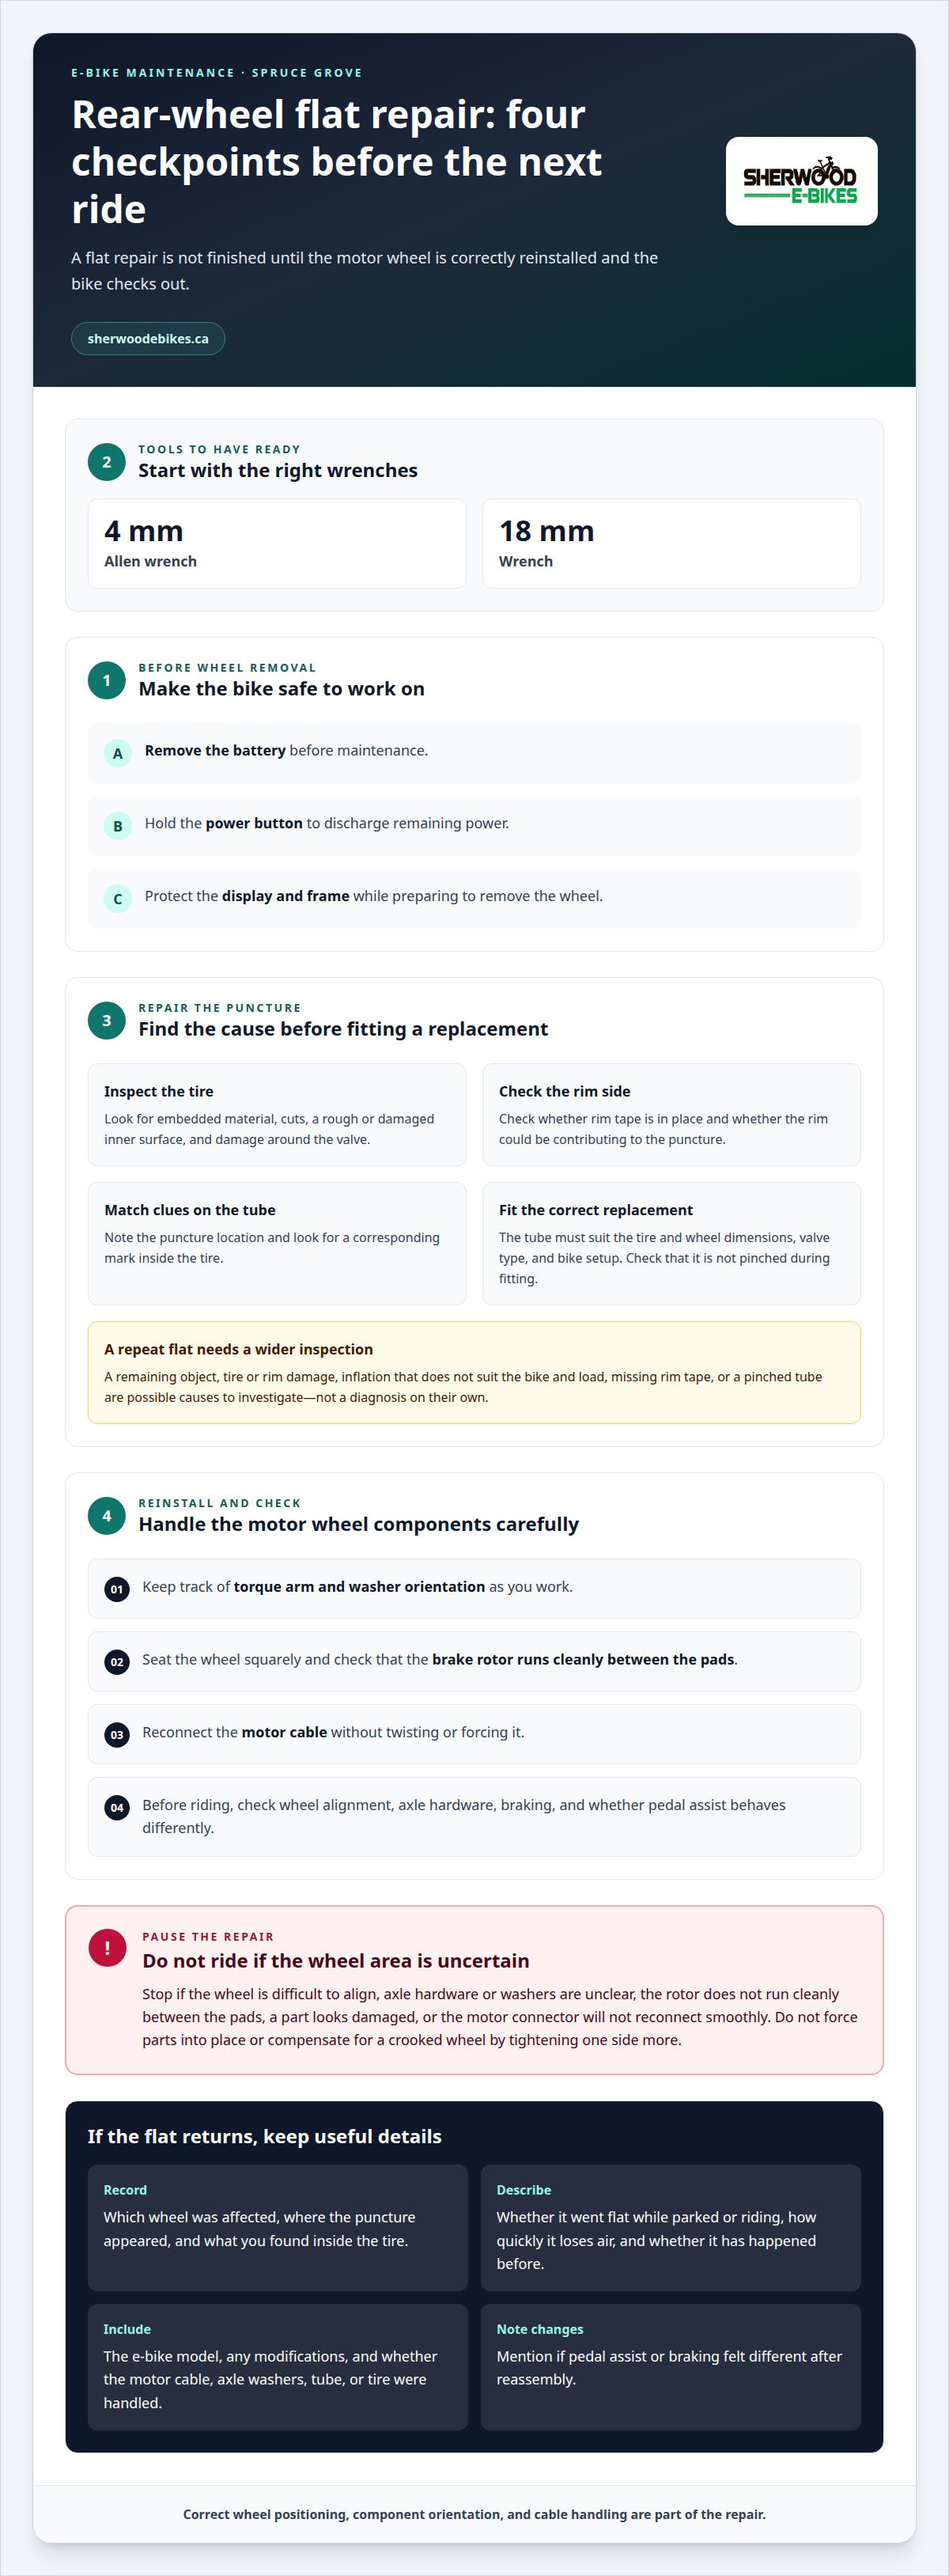
A flat is only half the repair; the rear wheel must also be reinstalled correctly. To fix a flat on an e-bike rear wheel in Spruce Grove, prepare a 4 mm Allen wrench and an 18 mm wrench, then remove the wheel carefully to reach the tube or tire. The battery should be removed before maintenance, and the power button held to discharge remaining power.
If you’ve fixed bike flats before, you know the job involves more than fitting a new tube. The motor cable, torque arm, washer orientation and brake rotor all need careful handling. That’s why fixing a flat on an e-bike rear wheel in Spruce Grove requires attention to reinstalling the wheel as well as repairing the puncture.
This guide covers preparing the bike, removing the rear wheel, replacing a tube or tire, and reinstalling the wheel safely. It also explains what to inspect to help prevent repeat flats and what to check if pedal assist behaves differently after the repair.
Key Takeaways
- Prepare the bike safely before removing the rear wheel, including removing the battery and protecting the display and frame.
- Have a 4 mm Allen wrench and an 18 mm wrench ready for key removal steps.
- Inspect the tire and rim for the cause of the flat before fitting a replacement tube or tire.
- Reinstall the motor wheel carefully, paying close attention to the torque arm, washer orientation, brake rotor and motor cable.
- Use E-Bike Maintenance from Sherwood E-Bikes Ltd. when you need help with the repair or want the rear wheel checked after removal.
Sherwood E-Bikes Ltd.
Sherwood E-Bikes Ltd. provides E-Bike Maintenance and E-Bike Parts for riders who need help with a flat, a recurring puncture or a rear wheel that doesn’t feel right after reinstallation. An e-bike rear wheel may bring together the tire and tube, hub motor, wiring and brake components, so the issue may require more than replacing a tube. If you’re unsure about the wheel’s fit, motor connection or cause of repeated flats, maintenance support can help you move forward safely.
A hands-on repair can make sense when the cause is clear and you’re comfortable working around the wheel and its electrical connection. If a part resists removal, the wheel won’t sit square, or the bike behaves differently after reassembly, pause instead of forcing anything into place. A service assessment is especially useful if you can’t tell whether the problem is limited to the tube or tire, or another wheel-area component needs attention. Sherwood E-Bikes Ltd. provides e-bike maintenance and parts to support ongoing bike care.
Know when to pause a home repair
Stop and seek maintenance help if the rear wheel is difficult to align, the axle hardware doesn’t sit as it did before, or the brake rotor no longer runs cleanly between the pads. These signs don’t identify a specific fault by themselves, but they mean the repair needs careful attention before you ride again. Don’t compensate for a crooked wheel by tightening one side more or forcing the axle into the dropouts. Incorrect wheel positioning can affect tire tracking and brake operation.
The motor connection is another reason to take care. If you pulled the connector apart at an angle, it looks damaged, or it won’t reconnect smoothly, don’t twist or force it. If pedal assistance becomes intermittent after removing the wheel, the new tube may not be the cause. A component near the rear wheel may have shifted during the repair, and further adjustments without identifying the cause can make the issue harder to resolve. Maintenance support is useful when a symptom appears after a repair and you can’t confidently identify what changed.
Pause if you’ve removed a fastener or washer and aren’t sure where it belongs, or if a part looks bent, worn or damaged. Small hardware can play a specific role in securing the wheel. Keeping removed components together and noting their orientation can prevent confusion, but memory alone doesn’t confirm that everything is correctly installed. If the arrangement is unclear, don’t ride until the wheel area has been assessed.
Distinguish a one-time puncture from a repeat problem
A single flat can result from hitting a sharp object, but a replacement tube that loses air again may signal an unresolved cause. An object could remain lodged in the tire, the inner surface could be rough or damaged, or the rim side could be contributing to the puncture. Replacing the tube without finding what caused the first flat can lead to another repair without fixing the underlying problem.
Note where the puncture is on the removed tube and whether there’s a corresponding mark inside the tire. This can help identify whether the problem came from the tread, the tire’s side or the valve area. Check for cuts, embedded material, damage around the valve or signs that the tube was pinched during fitting. If the puncture is hard to interpret or the tire casing is damaged, a maintenance assessment can help determine whether the tube or tire needs attention.
Repeat flats call for looking beyond the replacement part. Consider whether the tire was inflated appropriately for the bike and load, whether the rim tape is in place, and whether the wheel was reinstalled without pinching the tube. These are possible causes to investigate, not a diagnosis on their own. A useful inspection considers the puncture pattern alongside the tire, tube and rim instead of assuming every flat has the same cause.
Keep a simple record if the problem returns. Note which wheel was affected, where the puncture appeared on the tube, what you found inside the tire, and whether you’d ridden over a particular surface. If you installed a new tube, record whether the flat happened before or after reassembling the wheel. These details make the problem easier to explain and keep the discussion focused on evidence rather than guesswork.
Bring useful details about the bike and repair
When you seek help, share the exact e-bike model if you know it and describe the wheel or tire setup without guessing at specifications. E-bike versions can differ in details that matter for rear-wheel work, including the arrangement of drivetrain and wheel components. A clear model name, a photo of the wheel area taken before the repair, or a record of the parts you removed can help explain the issue. Mention any modifications too, since a changed setup may affect which parts are suitable.
Describe the symptom plainly. Say whether the tire went flat while parked or riding, whether it loses air quickly or slowly, and whether it has happened before. If the repair is complete but pedal assist or braking feels different, explain when the change began. Don’t guess which component has failed. A precise account of what happened is more useful than an uncertain diagnosis.
Keep the removed tube, tire or damaged part if it helps show what happened. Don’t carry loose sharp objects in a way that could cause injury, and handle contaminated or damaged parts as little as possible. A photo of the puncture or inside of the tire can also preserve details that may be hard to recall later. These are practical aids, not a substitute for a physical assessment if the wheel, brake or electrical connection doesn’t seem right.
Explain what work you’ve already done, including whether you disconnected the motor cable, moved the axle washers or replaced the tire or tube. Mention any difficulty seating the tire bead or aligning the wheel. Clear details help distinguish an unresolved flat from a completed repair followed by a new symptom. Don’t repeat a step that feels unsafe just to gather more information.
Choose parts for the actual setup
The right replacement tube depends on the tire and wheel dimensions, valve type and bike setup. A tube that looks close in size may still be unsuitable if it doesn’t match the tire. Before choosing one, read the markings on the tire and compare them with the tube specifications. If the markings are worn or unclear, share the details when discussing the repair instead of relying on appearance alone.
Choosing a replacement tire involves more than matching a general description such as “wide” or “fat.” It needs to fit the rim and suit the bike’s use. A commuter riding mostly on paved routes may need different tread characteristics from someone riding rougher paths, but either choice must fit the wheel. Sherwood E-Bikes Ltd. offers E-Bike Parts to support maintenance when a suitable replacement is needed. Choose based on the wheel and tire details, not just the bike’s name.
Don’t assume that tires with similar size markings will perform the same way. Tread shape, casing condition and fit on the rim all matter. A tire with visible casing damage may need replacing rather than fitting with a fresh tube. If the tire is in good condition and the puncture came from a removable object, a new tire may not be necessary. Match the repair to the evidence instead of replacing parts without a reason.
Keep the old part’s markings or take a clear photo before disposing of it, especially if you’re unsure which replacement to choose. This can help identify the size and valve arrangement. If you’re considering a different tire for your usual rides, explain the surfaces you use and whether you carry cargo. That context supports a practical discussion about fit and function without assuming one tread or casing suits every e-bike rider.
Think about how the bike is used
Riding conditions affect how quickly a tire wears and the hazards it encounters. Paved streets, loose gravel paths and rougher off-road surfaces create different contact conditions. Carrying cargo or a passenger also changes the demands on the bike, so recurring flats warrant attention to both tire condition and how you ride. This doesn’t mean your riding style caused the puncture. It provides useful context for assessing the repair.
If you commute on your e-bike, a flat can disrupt your route and make dependable maintenance especially valuable. If you carry cargo or use the bike for family travel, the repair should account for how the bike is loaded and where you ride. Tell the mechanic about your usual surfaces and load so the discussion can focus on a suitable maintenance approach. Don’t choose a replacement based only on what looks like a fit when your use places different demands on the tire.
Routine checks can help reveal wear before it becomes a roadside problem. Inspect the tread and sidewalls, look for embedded debris, and notice changes in how the wheel rolls or brakes. Check that a repaired tire holds pressure and that the bike feels normal on a cautious test ride in a safe area. If you find a cut, bulge, shifting wheel or unfamiliar noise, don’t keep riding to see whether the problem goes away.
If you do your own basic checks, distinguish routine observation from adjustments that require confidence with the rear hub-motor assembly. Looking for visible tire damage is different from adjusting axle hardware or electrical connections. If the work goes beyond what you can identify and handle securely, E-Bike Maintenance is a suitable next step instead of repeatedly removing the wheel without resolving the symptom.
Use maintenance support for the whole problem
A flat repair can reveal a second issue that wasn’t obvious before the wheel came off. You may notice a new rubbing sound, uneven braking, intermittent pedal assistance or a wheel that sits differently in the frame. Report the change and when it began. That timeline can help distinguish a problem that existed before the puncture from one that appeared during disassembly or reinstallation.
Maintenance isn’t just about replacing a failed part. It can also clarify what needs attention next. If the cause of the puncture is still in the tire, installing another tube won’t remove it. If the wheel isn’t aligned, adding air won’t correct its position. If a cable or sensor has shifted, the flat alone may not explain a change in assistance. A clear assessment connects the original repair with the bike’s current behaviour, so the next step responds to the actual symptom.
Bring the bike in for maintenance if the rear wheel won’t sit square, the brake rotor doesn’t pass cleanly through the caliper, or the motor connection doesn’t seem properly seated. Do the same if a fastener feels loose, you’re unsure where an axle washer belongs, or you can’t confirm that the wheel is secure. Stop and seek help rather than tightening parts until they feel firm. Correct fit and assembly matter more than finishing quickly.
If the wheel looks correctly seated but pedal assistance behaves differently after the repair, describe the change before making further adjustments. The speed sensor and its magnet need to remain correctly positioned for the bike’s assistance system to read wheel movement. A shifted component may cause inconsistent assistance even when the tire is repaired. Avoid changing several parts at once, since that makes it harder to identify what resolved the symptom.
Sherwood E-Bikes Ltd. also offers Cycling Accessories and Commuter E-Bikes for broader ownership needs. These offerings are separate from diagnosing a specific flat, so they don’t replace a careful rear-wheel assessment. First make sure the tire, wheel and connected components are in suitable condition before returning to regular riding. If the repair has become uncertain, resolve that issue before adding equipment or changing the bike’s setup.
Return to riding with a clear result
After maintenance, the bike should feel consistent with its normal operation. The wheel should track properly, the brake should work as expected, and pedal assistance should behave normally. Start with a careful check in a controlled setting, not a demanding ride. Listen for new sounds and watch for rubbing or changes in handling. If a symptom remains, report it promptly rather than assuming it will go away.
When a flat interrupts your plans, it’s tempting to focus only on getting air back into the tire. A better goal is to find out why it went flat, fit a suitable replacement if needed, and reinstall the rear wheel correctly. That may be straightforward if you have the right tools and experience. If the motor-wheel assembly or repair result gives you pause, maintenance support can help prevent a simple tube replacement from becoming a larger concern.
For riders in Spruce Grove, Sherwood E-Bikes Ltd. is a local option for e-bike maintenance and parts. Its E-Bike Maintenance service is relevant when a repair involves more than a tube, a recurring flat needs investigation, or the rear wheel doesn’t seem right after reinstallation. You can share the model, the work already attempted and any remaining symptoms to give the discussion a practical starting point.
If you’re unsure whether the problem is only a flat or part of a larger rear-wheel issue, pause the repair and describe what you’ve found. A clear account of the tire condition, puncture pattern and changes after reassembly keeps attention on what the bike actually needs. Sherwood E-Bikes Ltd. provides E-Bike Maintenance and E-Bike Parts to support your next step, so you don’t have to keep troubleshooting a repair that no longer feels straightforward.
Contact Sherwood E-Bikes Ltd. to discuss your e-bike flat repair and maintenance needs.
Get Back to Riding with Confidence
A rear-wheel flat can be a good opportunity to reset your maintenance routine. Once the repair is complete, track tire wear and changes in how the bike handles or responds. Keeping a record can make future maintenance more focused and help you spot a small issue before your next ride.
If fixing a flat on an e-bike rear wheel in Spruce Grove raises questions about the wheel, replacement parts or the bike’s condition, Sherwood E-Bikes Ltd. can help you choose a practical next step. Its E-Bike Maintenance and E-Bike Parts support repairs, while Commuter E-Bikes offer another electric mobility option.
Keep your e-bike ready for the rides ahead. Contact Sherwood E-Bikes Ltd. for repair help, and take your next step toward riding with confidence.
Frequently Asked Questions
How do you remove the rear wheel on an e-bike?
Remove the battery, hold the power button to discharge remaining power, and support the bike securely with its handlebars resting on blocks if you turn it upside down. Protect the chainstay with a paper towel, then disconnect the motor cable by pulling it straight apart without twisting. Photograph the axle-washer orientation before loosening the axle nuts. Check your e-bike’s instructions for the correct tools; some setups use a 4 mm Allen wrench for bashguard and torque arm bolts, and an 18 mm wrench for the axle nuts. Don’t touch the brake rotor with bare hands.
How do you replace or repair an e-bike rear tire and inner tube?
After removing the wheel, use tire levers to release one bead from the rim and take out the tube. Check the tire’s inside and the rim for the cause of the puncture before fitting a replacement, or the same object may puncture it again. Inspect the tire for damage that could make it unsuitable for reuse. Fit the tube without pinching it under the bead, then inflate it and check that the tire sits evenly on the rim.
What tire and tube size fits an e-bike rear wheel?
Use the size printed on your existing tire as a starting point, then match the replacement tube to the tire size and valve type. E-bike models and wheel setups can differ, so don’t choose a tube by appearance alone. If the tire marking is worn or the wheel has been changed, note the model and bring a clear photo of the tire and rim when sourcing a replacement. A mismatched tube can fit poorly or fail to seat correctly.
What tools are needed to fix an e-bike rear flat?
For rear-wheel removal, check your e-bike’s instructions for the required tools. Some setups use a 4 mm Allen wrench for bashguard and torque arm bolts, plus an 18 mm wrench for the axle nuts. A 10 mm wrench may help turn the axle to align its flat sides with the dropout sides. Tire levers help lift the tire bead, and a pump is needed to inflate the replacement tube. Keep removed hardware organized, and stop if the wheel or electrical connector won’t come apart smoothly.


